How to use pliers to connect wires
How to connect wires using clamp pressing method
Use the clamping method to connect the wires, and operate according to the following requirements:
(1) Before clamping and connecting, select the appropriate connecting pipe first. The model of the selected connecting pipe should match the wire model.
(2) Remove dirt on the surface of the wire (the removal length is twice the length of the connection part), and wrap the strands at the connecting part tightly with tie wires (the wire must not be broken or loose, and the twisting direction should be the same); clean the inner wall of the connecting pipe and apply neutral Vaseline.
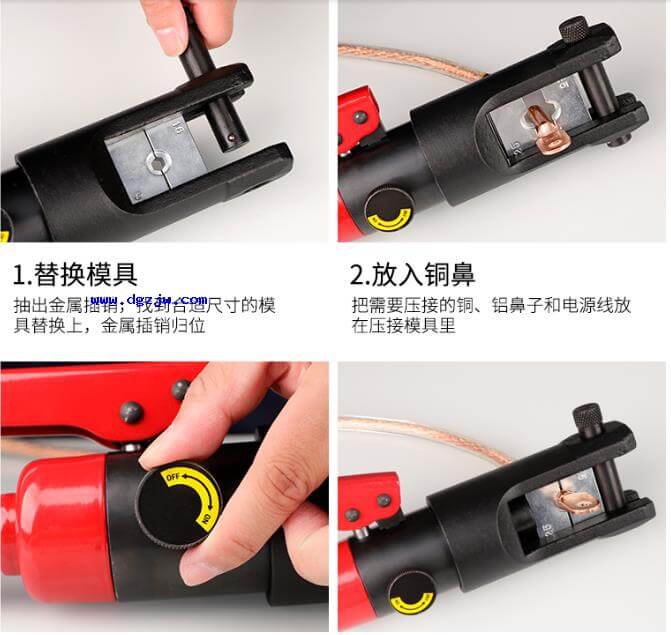
(3) Refer to the figure to draw the position of the clamp pressing port, and perform clamp pressing according to the operating sequence shown in the figure. The allowable error of the crimp size is ±5 mm.
(4) After clamping out, the exposed length of the wire end head shall not be less than 20 mm, and the binding wires at the wire end head shall not be removed. The connecting pipe after crimping must not have cracks, the bending degree must not exceed 2% of the length of the pipe, and the resistance of the connecting pipe must not be greater than the resistance of the wire of equal length. Otherwise, the reconnection should be cut off. After crimping, there must be no “lantern” or “cramp” in the conductors near both ends of the connecting pipe. The outlets, joints and exposed parts of the connecting pipe should be painted.
(5) The clamping pressure tube is allowed to be used to connect copper wires, aluminum wires and various steel core aluminum wires with a cross-section of 35~240 square millimeters; when connecting steel core aluminum wires, a gasket should be installed in the middle; except for two connecting pipes used for AC-240 wires, the rest of the wires use one connecting pipe.


Leave a Reply
Want to join the discussion?Feel free to contribute!